Monday, September 17, 2012

Electrical panel art project, part deux

I was able to eke out some more time this past weekend to work on the new cover for the electrical panel. When last you saw it, it was a plywood panel nailed onto a frame. During the week I filled in the nail holes with wood filler and sanded. And then...

I got the base-coat of white painted on.

Then I added a coat of Piedmont Grey. If you're keen, you'll recall that's the same colour we've been using on the cabinets around the cottage.

What's that!? AUGH! the wood panelling bubbled from the moisture in the paint! It's ok, right? It's supposed to look distressed and worn, right!?

In hindsight, I probably could've skipped this coat, because it doesn't show much through the top layer of paint, which is...

... Polar Jade. This is the darkest colour in the striped fabric in the living room, and also the colour of the piping I put around the pillows that I made not too long ago.

After meticulously painting the final coat on and letting it dry, I grabbed a coarse-grit sandpaper and scuffed the heck out of it. That pained me. Kind of a lot.

I'm not super happy with the distressing either. I doesn't look as "worn" as the inspiration panel. I think I need to beat it up more. Maybe drag it face-down along the driveway?

I noticed something else at this point. Does this not remind you of a "green" chalkboard from school? That was not the look I was going for!!!! *bites nails* Too late to turn back now.

I broke out my handy-dandy enlarger projector and traced the small image I wanted onto the panel.

And then I started to fill it in with white paint. this photo is after the first coat of white on the letters.

It's taking me a bit longer than I had expected to build this, but the price is right. As a ballpark effort estimate, I figure I've spent:

1-hr putting together the frame and panel
30 minutes on each coat of paint (1.5 hr)
30 minutes - maybe less - to trace the words
30 minutes on each pass of the letters  with white paint (2 so far).

Total effort: About 4 hours, but it's been a work in progress for nearly two weeks as I wait for paint to dry, etc.

I'll post another shot when we get it mounted so you can see how it looks in situ.


*disclaimer: I would like to add that I had no intention of completely duplicating the inspiration panel. I had spent several hours in photo shop fiddling with various fonts, but at the end of the day, I just love that dang cursive font so much I HAD to use it. Don't do what i do.

Wednesday, September 12, 2012

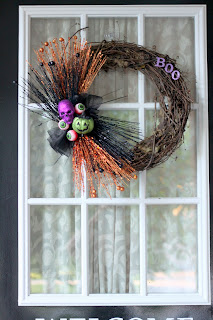
Hallowe'en wreath

This one has nothing to do with the cottage, but it's a build/project that the princess and I undertook after a little binge at Michael's so I figured I'd share.

I went in to the store because white satin ribbon was 50% off (needed for dance skirts) and came out with all the fixin's for a Hallowe'en wreath. *face palm*. At least I remembered to buy the white satin ribbon. All of the supplies were on sale, so I justify my actions that way.

I think we spent $14 altogether on supplies (include tax).

Here is the wreath that the wee princess and I slapped together on Sunday afternoon with a hot-melt glue gun.


It used:
  • a grapevine wreath ($2.99)
  • 4 sparkly sprays (2 black, 2 orange) ($1.18 ea)
  • 1.5" black sheer ribbon ($2.99)
  • A glitter skull ($1.18)
  • A glitter jack-o-lantern ($1.74)
  • Styrofoam eyeballs ($.85 for 4).

The eyeballs were actually 4 in a package, but since we only used three, I've been leaving the fourth one in various spots around the house to surprise people.

SURPRISE!

Monday, September 10, 2012

Electrical panel art project

Howdy readers! (or mom, since she's probably the only one still reading [waving at mom!])

I got started on the electrical panel art project. Yep. ART project. I'm going to make a giant wall-hanging (I dare not call it a "painting" for fear of being pretentious) to cover the electrical panel, instead of the mui ugly cabinet that's there now. It'll be hinged on the left side to allow it to swing open like a giant door.

Here's my inspiration ($125 USD on Etsy):

Because the space I want to cover is about 4'x4', I'm going to change the dimensions slightly, and I'll use different colours since red just doesn't go.

The supply list (all picked up at the Big-Box DEPOT of Building and HOME supplies):
(disclaimer, I can't find my receipt, so I can't give you exact prices)
  • 4'x4' sheet of birch plywood (~$10) ← it's handy because it comes already cut to that size! It's not handy because it's hard to transport home; just ask the kids who rode home with it balanced on top of their heads.
  • 1x2x8 finger-jointed pine (2x~$3.00=$6.00)
  • utility hinges (~$1.00 = 1.00)
  • corner braces (~$2.00 for 4)
  • friction catch (~$2.00)
  • paint (2 tester cans @ $7.50ea =$15.00)
  • nails/hammer or SuperAwesomeAirNailer♥
  • square 
  • tape measure/pencil
  • saw
  • wood filler
  • sand paper
Total cost:  about $36 bucks?


Fortunately I didn't need to resize my sheet of plywood, but if it had been necessary I would've asked the nice wood-cutting dude at the store to cut it for me. He cut the 1x2's in half so I could fit them into the car since I needed two boards that were 48" and two that were 46.5". (I cut the two 46.5" boards on the chop saw at home).


So on to the build. I worked a little bass-ackwards, and rather than building a frame and attaching the plywood to it, I tacked the 1x2's on their edges to the plywood and then connected them to each other. Menh. It worked.
(please don't look at the disaster in my garage. Thank you.)

This step is probably overkill, since with a big sheet of plywood I can't see it sagging much, but I reinforced the corners with some corner braces.  Rhombus art = bad.

This is my new best friend. I used an old-school screwdriver to install one corner brace (4 screws) and my wrist was dying. WIMP. Never again. Cordless Screwdriver for the win!


And this is where I left off.

Next steps:
Apply wood filler to the edges of the plywood and sand (must find wood filler. Did we leave it at the cottage? Methinks yes) and prime it for painting. Painting is the fun part. I might rope the kidlets into helping.

Friday, September 7, 2012

I'm remiss I'm remiss I'M REMISSSSSSS

OK. I've totally let the blog slide lately. Can you forgive me?

I can assure you my reasons are good. First and foremost there are a limited number of hours in a day and when my Real Job™ takes all of them, there's little time left for family, showering, and luxuries like cottage blogs.

Selfish, I know.

Let's just say that August was a disgusting write-off and I have the tendonitis in my mousing elbow to prove it. Owwie.

BUT. Have no fear. I have some schemes in the works that I hope to share with you to. I've got a couple of projects planned.
  1. I intend to build my own floating shelves to add to the Princess's dance studio to house all of her trophies because she's the most AWESOME daughter ever (next to me, naturally). 
  2. Secondly, I don't know if you remember the electrical panel at the cottage. It's hidden behind questionably fabricated doors in a chunky UGMO cabinet. I intend to make it... better. [squints eyes and rubs hands together schemishly].

I hope to make some headway on that one this weekend, now that we're into our fall schedule of single days at the cottage on weekends (shakes an angry fist at Dance) which means I'm home on Saturday to get stuff done.

In short: Sorry, and Stay Tuned!