Showing posts with label bunk room. Show all posts

Monday, May 24, 2010

One! ah, ah, ah....

We've finally finished a room at the cottage.

Finished might be a matter of perspective. I still want to work on the quarter-round trim that can't be installed on the baseboards because the gap between the baseboard and the floor is so great the quarter-round slips beneath it. *exasperated sigh*. And.... we really need to get an electrical outlet into that room.But other than those two things, this room is D-U-N, dun.

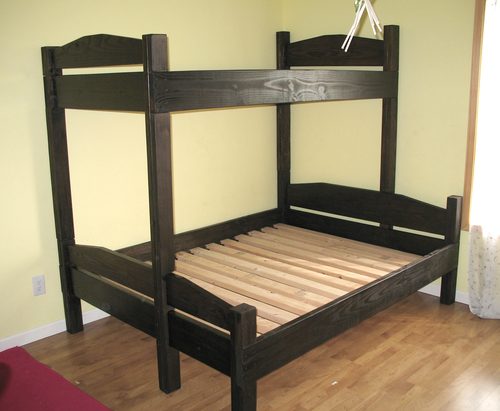
Without further ado, I give you......... the bunk room! [oooo...... ahhhhhh!]
OK... So I'm feeling a little proud of myself with this one. I love this room! The kids love it too. For the longest time it was the only clean and tidy spot in the whole cottage. It was their refuge. I would sneak off to lie down on their new clean gooshy mattresses.

Some fun details in this room include the magazine racks installed with each bed. There isn't room in this 8'x8' closet of a room to allow for any kind of a bedside table, so these allow the kids to store their DSs (or, if you're a devious sneak like my son, the plastic bag from the chips you stole from the kitchen without asking.)

I got the idea for these here. I had the ladder trim left over from our old house in Kanata, and asked Handy Dad to cut out the side boards for me from some scrap lumber I had in the garage. Ask for cut boards, get back beautiful fabricated, filled, and sanded finished magazine racks. I just slapped a bit of paint on them to make them match the bed.

I even hung the wah wah wahhhhh seashell wall art. You know what? They're not totally awful. I might have to keep them.


OK. Time for a quick Sarah Richardson-esque cost breakdown for this room:

Big ticket items ($598):
Bed: $150 @ IKEA
Mattresses $170 x2 @ IKEA = $340
Flooring*: 3 boxes @ $35.76/box (we didn't use all three, but we needed more than 2) = $108

Extras ($165):
bedding -$20 (so cheap) - IKEA
quilts - $32 x 2 = $64 - bed bath and beyond
magazine racks = FREE! - Handy Dad
wall paint = about $45/gallon, but I only used half, so let's say $23 - Benjamin Moore
bed paint = dang, can't remember! Let's call it $15. - Benjamin Moore
stars = $9 - White Feather
frames = $7 - Dollarama
birds = $5 ea. - Michael's clearance aisle. Score!
book box thing - urg...I think $10 - Michael's
dresser - Free - donated, formerly in D's "baby" room
Curtain - $7: fabric: IKEA (half meter), hardware: Fabricland, awesome sewing: Mom.

Total cost: $763.

Eat your heart out, Sarah!


*for the record, I LOVE this flooring. So easy to install and it looks fantastic. One caveat for you though: there are "print runs" of the laminate. Meaning, if the dates on your boxes aren't the same, there will be colour variances among your packages of flooring! Very noticeable differences. Check your boxes before you leave the store.

Thursday, May 20, 2010

This is how we roll

So I mentioned needing twin mattresses, yes? Acquiring mattresses is really the least of my concerns. The big issue is how the heck we get them to the island in a boat that's so tippy its balance shifts when you look from right to left! It's not exactly a pontoon boat.

Option A: Try to put the mattress in That Damned Boat ™. It might act as a sail. It might tip us over. Either way, it'll be a tight fit.
Option B: Pay Marvin the martian marvelous to bring the mattresses over (cost: $25).
Option C: Mooch off new neighbours yet again to have the mattresses brought over in their pontoon boat (cost: forever being labelled the island mooch)
Option D: Buy the mattresses at IKEA where they come rolled up in nifty and compact little packages. Ohmygoodnessyes.

Check this out:

Each of these tubes is 12 inches in diameter, about 3-and-a-half feet long, and weighs 20 lbs. They're SULTAN FONNES mattresses from IKEA. And they fit very neatly in the truck, in the boat, and hopefully in the kids' bunk beds!

If they work out well and are even half-way comfortable, we'll be getting the same for our room.

This afternoon I'll be picking up the paint for the bedroom and the livingroom/kitchen. Tomorrow we load up and head to the cottage for our first extended stay: A three-day long weekend with no dance practices. Heaven!

Sunday, May 16, 2010

A bit of an improvement

I'm filthy and I smell of paint and bug-spray. Someone's going to have to wipe this smile off my face, though.

We had an absolutely stellar day at the lodge!

We awoke early, loaded up, drove to the Depot, gave them all our money, then headed to HPL. We met Mum and Dad at the landing and they joined us for the day. Apparently it was gorgeous outside. I couldn't tell as I spent all of it inside painting in the back bedroom. It. Looks. So. Good.

A quick refresher:
Before: a charming melange of white panelling, grey trim and a certain je ne sais quoi with the red shag carpet. (remember, you can click on photos for close ups, though in this instance you're probably better off not to)
Yesterday, while D and I were still at dance competition, the boys got the primer on the walls.

Today, I got started with the painting. Don't worry, I've already threatened revenge on my mother for not only photographing my butt (augh) but for photographing it from such an unfriendly angle when I appear to have left my neck at home. (augh augh).
The work of many hours reduced to no time at all through the magic of blog: Tada! The painting is finished! The paint is still wet in spots, that's why it's blotchy (my story and I'm sticking with it.
At about supper time, I informed the Captain that I wanted to get the floor into the room today too. He politely commented that he thought that plan was rather "ambitious" but wisely didn't say more. Otherwise, he'd have found the uncomfortable end of a utility knife jammed up his nose.
I have to confess, this "Allure" flooring is nifty stuff! It's about as thick as a piece of cardboard and you score it a couple of times with a knife and snap it to finish the cut. One edge (the grey bit you can see in the photo) has adhesive facing up. The opposite edge of each plank has adhesive facing down. Layer one sticky bit on the other, and Bob's your uncle! The flooring sticks together. You don't need any kind of underpad, and it doesn't stick to the subfloor, so it floats over most everything. It's flexible stuff, so it molds to the contours of the floor.

There is one caution I have though, and the Captain can tell you about this from first-hand experience: the adhesive is VERY sticky, so if you happen to kneel on it by mistake, you can expect to lose a neat strip of leg hair.

(Oh, I laughed until my belly hurt. Does that make me a bad person?)

What impressed me was how quickly the floor went in. We started the floor at 6:45 and by 7:30 it was done. That includes the small learning curve at the beginning as we figured out how it fit together, how best to cut it, etc. Sure, the room is only 8' x 8', but still. That's fast!
We still need to paint and install some quarter-round trim at the bottom of the baseboard, but this room, she's darned near done!

I have a few more photos of this weekend's cottage projects to share, a new raft of colour samples (this time for our bedroom), and some plans for the bathroom and next weekend in general.

Good times!

Tuesday, May 11, 2010

Menh

Don't you hate when you have a fantastic idea that, when implemented, leaves you flat?

Here's my super awesome "You're not worthy" solution to the kitschy ropey frames:

Waw, waw, Wawwwwww. :-(

Seashells on sandpaper! It sounded brilliant in my head. It really did.  Now they're just, I dunno, "Menh..." Maybe it's just because they're sitting there all by themselves looking drab and boring? I didn't want them to be too busy because there's already so much going on with the frames.

I'll hang 'em up when we decorate the room, but if they're still not making my Skirt Fly Up™, I might have to find a plan B. Fortunately, at $2 a piece, I'm not married to them.

flying skirts unabashedly plagiarized from pioneer woman.

Thursday, May 6, 2010

Bunk room progress report

We made some good demolition headway in the bunk room at the back of the cottage this past weekend.

It all started with a late-night cull of the hundred or so 1990s relic VHS tapes in the back dresser.  We kept a few, since there's a VCR integrated with the TV they left behind.
Highlights: Galaxy Quest, Mars Attacks, and Return of the Jedi.
Into the trash: 1991 World Series, Something with Goldie Hawn in it, and Rocky V. Among many others.
The captain insisted on recycling the tape cases. Do gooder!

Once the dresser was emptied we carted it, the mattress, box spring, and bed frame into a bunky for storage. Oh - interesting tidbit we learned this weekend: Apparently Peaky is the original cottage! Who knew.

Once the room was empty it was time to tackle the carpet. The spectacularly heinous red shag carpet. It was very satisfying to cut it up with a utility knife! *hack!* *slash!*
It was... dirty. Ick.
With the carpet out of the way, all that was left was to pull some staples, sweep the floor, vacuum up the ants (I suspect they're living in the wall. Dammit. Now they're dizzy and angry, trapped inside a shop-vac), and wash the walls and trim.

Up next: Paint and flooring! Ooo.. Now that's exciting. The bunk bed is painted and ready to be set up. We still need to pick up some inexpensive twin mattresses though. I'm hopeful that we'll see this room finished and decorated on the May 2-4 long weekend. *fingers crossed*

Tuesday, April 27, 2010

Cottage Kitsch

Gosh, has it really been a week since I posted anything?

We didn't visit the cottage last weekend. The winds were strong which means the lake was roiling.


(photos from Rice Lake Today)
I think I also needed a weekend with no to-do list!

I did do a bit of cottage shopping for kitchen items (measuring cups, scissors, that kind of stuff) and picked up some cheapie decor items at the Dollarama. You might remember my struggles early on with the living room colour-scheme. I couldn't decide if it was retro or fresh, remember? Well, maybe it's a bit of both.

I found these fantastically ugly - so ugly I love them - owls at the 'rama. Aren't they horrid?! Pure 70s kitsch. I'm calling them Hodge, Podge, and Lodge.

"Toowhit toowhee! Toowhit Toowhoo!"

Now, before you think I've totally taken leave of my senses, here's a photo of Hodge, Podge, and Lodge with a fabric sample.
Eh?! They kinda go, don't they!? Gosh they're ugly.  They'll look great hanging out on a shelf together.

The other 'rama find was an 8x10 frame. I bought three. Please ignore the "artwork" shown in the frame.
I like the rough and the ropey look to them. I'm thinking about putting these in the bunk room. I don't know what I'm going to put in them, though.
*puzzle* Suggestions welcome!

I was thinking nautical flags.. then I was thinking "Hodge Podge Lodge" (one in each frame), then I was thinking just patterned paper, then I was thinking cross-stitch, then I was thinking photos of fishing lures, then I was thinking photos of fish, and now I'm so awash in ideas I'm aimless. Thoughts?

Monday, April 5, 2010

Bunk beds status report

Howdy all.

Sorry for the lack of posting of late. Excuse #1 is that there haven't been many new developments; just a whole lot of waiting. And yes, it's killing me. KILLING. ME. I've never been known for my patience. Waiting for the ice to leave the lake (it has) waiting to get a boat (we haven't).

Excuse #2 is that I got derailed last week working on the tutu tote for my wee dancing daughter and this week putting coats of paint on the bunk bed boards. (More on that in a minute).

Then, Easter weekend turned out to be absolutely gorgeous (25°C? Yes please!) so I spent all of it working way too hard in the gardens around the house getting them ship shape before I utterly abandon them for the summer.

So back to the bunk bed boards. I figured it would be easier to paint the boards here and then transport them to the cottage and assemble it there. It's taking a fair bit of time (at least 6 hours so far), but it's worth it. I'm really happy with the colour.

Step 1 was to prime the unfinished wood boards. I opted to use spray-on BIN primer sealer. I love this stuff. It will cover and seal anything (stain, oil, latex, pine sap, water damage, smoke stains, you name it). Would I use it again? Absolutely, but I'd buy a can of the brush-on primer instead. The spray cans didn't yield the coverage I wanted so I went through four of the darned things, and they had a tendency to get gummed up while spraying - even though I was diligent about inverting the cans and spraying to clear out the nozzle after each use). That and my garage is now coated with a fine, white mist. Good thing I used a drop sheet over the important stuff!


Where was I? Oh, right. Primer. I wanted to use a grey primer so it wouldn't show through the paint as much, but they didn't have grey BIN. Once the boards were primed I gave them a light sanding because the primer had raised the grain a little bit.

After that, it was on to the paint. I used a pint (honestly - how anachronistic are the paint companies!? In no other situation do I refer to something as a "pint". Maybe I'm not drinking enough draft beer?) of Benjamin Moore Confederate Red. It's a medium red with just a hint of rust in it. The first coat went on with reasonable coverage, and the second coat is nearly perfect.

If I were being extremely fussy, a third coat would be warranted, but I want the room to have a bit of a rustic country feel to it and it is, after all, a cottage. There is no room at a cottage for perfection, with the following exceptions:


- weather
- sunsets
- meals
- company

So the boards are very nearly done. I still need to do the second coat on the back side of a few of them, then I'll be pleased to have that job out of the way.

Thursday, March 11, 2010

I made this!

Toot! Toot!

I'm tooting my own horn today. See these cute pillows? Total cost: $3.40 each. You can't beat that! My secret: I used cotton/linen tea towels from IKEA at $5.99 for two.

The pillow stuffing is a combination of polyester fiber-fill and foam chips that I've had lurking around my craft room for 5+ years.

I like to use foam chips for pillows, even though they're a tremendous mess to handle, because I find pillows stuffed with the fiber-fill only look nice and puffy at first, but then get mashed flat after a few uses. With the foam in there, it springs back out after being compressed.

Sunday, March 7, 2010

Damn you, IKEA! *shakes her fist*

We went to IKEA today to buy the bunk bed for the kids' room at the cottage.

We left IKEA $500 lighter.

I told you.... I TOLD YOU I can't leave that place without dropping $500! Did anyone try to stop me? NOoooooo.

In actuality it came to $492.31, and we didn't even get a $0.50 hotdog. Dangit.

In addition to the lurvly bunk beds which I can now paint, I also picked up:
-striped fabric for the kids' curtain
-coupla toss cushions
-cutlery ($4.99 for a set 20 pc.? ding ding!)
-plastic plates and cups a'plenty
-linens for the beds
-cute coat rack for inside the front door

And some stuff for around the house (about $65 worth).

It looked a bit like this (boy, it sure doesn't look like much when you present it this way):


It's all arranged on the quilts I picked up last weekend. The striped fabric will be for the roman shade in the kids' room, and the plaid will be some extra cushion covers. I've already picked up the paint for the walls and the bed. Walls will be the tan, bed will be the lighter red.

In this photo you can see the toss cushions with the embroidery on them.
♥ Love! ♥
I wanted the big *cough* $30 pillows, but Captain cheapiepants was there, so I compromised on the cheaper, smaller pillows.


And following are some photos of the individual bits and pieces.


Tuesday, March 2, 2010

So about those bunkbeds


I have grand plans of building my own bunk beds. I've found the dream plans for it: straight cuts, basic timber, how hard could it be?

I went to Lowes on the weekend to price out the lumber. Gah. My lovely, money-saving bunk beds are going to run me $320+!! It's all because the design uses 1x? timber. The schmancy wood costs easily four times as much as the construction-grade stuff. This does not save me money.
 
Excuse me while I sit here and pout for a few minutes.

[pout]

[pout]


Now that I've gotten that out of my system, I have a few possible bed schemes to share with you.

Scheme number one [rubs hands together scheme-ily]:

IKEA.

Bor-ing. I know. But it's a very affordable scheme. $150+tax will get me a pine bunk bed with slats. Not glam, but very functional (and paintable). Comes with a hot dog for $0.50 more. Hot dogs can make or break the decision for Captain Cheapiepants, who is nearly as ravenous as he is cheap.


Scheme number two [more scheme-y hand rubbing]:
Build my own bed out of 2x3, 2x4, and 2x6 construction-grade boards, essentially the same design as the IKEA bed, and buy the bed slats from IKEA for $21. Will run me about $90 before taxes, including the slats. Does not have an optional hot dog.

Of course a trip to IKEA for a $150 bunk bed, or even just for $21 slats will end up costing me at least $500 because I can not leave that place without dropping a boatload of cash. "Swedish for Common Sense" my ass.

So here's the question I'm asking myself:
"Is $60 worth the time it's going to take me to measure, cut, and drill the wood, because either way I'm going to be painting and assembling the bed m'self."

I'm leaning towards "yes!", because I really like to make sawdust.

What would you do?

Monday, March 1, 2010

If your nose runs and your feet smell...

... you're put together upside down (or so sayeth my dad, who knows a lot about this sort of thing).

I think I might be put together upside down, but not because my feet smell.

[pause]

*sniff*

Nope. We're all good here.

No, the problem is that I've been going about things backwards:
- Go to buy a cottage; don't have any money lined up to pay for it.
- Buy an island cottage; don't have a boat.
- Buy linens for bunk beds; don't have bunk beds.

I need to back up for just a second. You need to know that I was contemplating making easy nine-patch quilts for the kids' bunkbed at the cottage. I figured I could do it for less than it would cost to buy 2 quilts. Everything I was seeing online was costing $100 or more per quilt to buy something prefabricated. Then I did some price checking on quilting cotton. It was probably going to run me about $50 to make it. But still... that's $50 in my pocket!

Then I did a bit more digging and found something online for about the same price. AND I didn't have to lose days of my life assembling it. Win-win.

I went shopping yesterday for twin-bed quilts. I fully intended to buy this:
 
Because, well, it was cheap ($50/twin).  And the colours were nice. I found it at Bed Bath and Beyond.  Captain Beaver-pincher said "I bet there's an online coupon for that store." And sure enough, after some digging he finds a coupon for 20% off. So, off we go to the store with two coupons printed out (one for him and one for me) to buy the pretty quilts.

Only, when we get there, they don't have them. (dangit!) Eric asks a clerk if they have any in stock, and they don't (dangit!) but she asks if we saw the red Nautica quilts that are on sale at the front of the store. So we toodle over and we see these:
Well, not exactly. What we saw was a quilt in a bag, but unfolded, this is what it would look like.  Not bad! It has that patchy, cottage-y, rustic quilt quality that I was after, and I love the colours (I'm a sucker for reds). Best yet: they were on sale for $39.99 (reg $109)! Factor in captain cheapiepants' coupons, and they came to $32 ea. plus tax.

WOO!

Here's another look:
Dangit I love a bargoon.
Now that I have the quilts, I have the colour scheme for the back bedroom. The walls will be tan and I'll paint the bunks red. Oh, the bunks. [shakes head] that's a story for another post.

Thursday, February 18, 2010

I might be insane

I know there are some of you reading this who are saying to yourself, "'might be insane'!?", but hear me out. There's a reason for my confession.

I've been gifted, nurtured, born with a handy gene. Primarily this manifests in crafty ways (scrapbooking, sewing, knitting, etc.). I've also been raised to be thrifty; I pinch my nickels so hard the beaver is uncomfortable. Every so often these character traits collide in a perfect storm of thrifty creativity and I catch myself uttering the dreaded phrase:

"They want how much for it?! But I could make that!"

I've done this quite a bit lately. Buying a cottage has turned my thrift level up to 11. Where there is thrift, creativity takes hold.

"Necessity is the mother of invention!"
"Uncomfortable beavers lead to insanity!" (I just made that one up.)

I've been re-covering the seats of some teak chairs donated by a friend (you'll see that in a later post), and my fruitless search for inexpensive bunk beds is now leading me to a scary place: I think I want to make my own beds.

It always looks easier than it turns out to be in real life (much like decorating a cake). There are countless free plans on the web for bunk beds, from the bizarre to the practical to the deluxe. I drew some sketches last night of a bunk bed that might work, but then I found this on the Interwebs:

 
 (photo from http://woodgears.ca They have nice plans for single and double beds too, if you're curious)
It's kinda nice, no? I like that it's a single over double too. I'd like to put a bunk bed in every room to bump up the available sleeping space in the cottage for crowded weekends. It's made with common Big Box timber (2x4, 2x8, 2x10, 2x2, and 1x4) and doesn't look that complicated to assemble. I'd add a rail to the top bunk though. It's scary otherwise. I figure it'll be sturdy, looks not too bad, and it won't break the bank.
I have a compound-mitre saw, and I know how to use it!


UPDATE: Oh, dear. I might be in love. link (with thanks to Alison)